Select Page
The Exchange admin center (EAC) lets you enable the archive mailbox only individually – for one user at a time. For bulk actions, refer to the section on using Windows PowerShell.
  1. Sign in to the Exchange admin center.
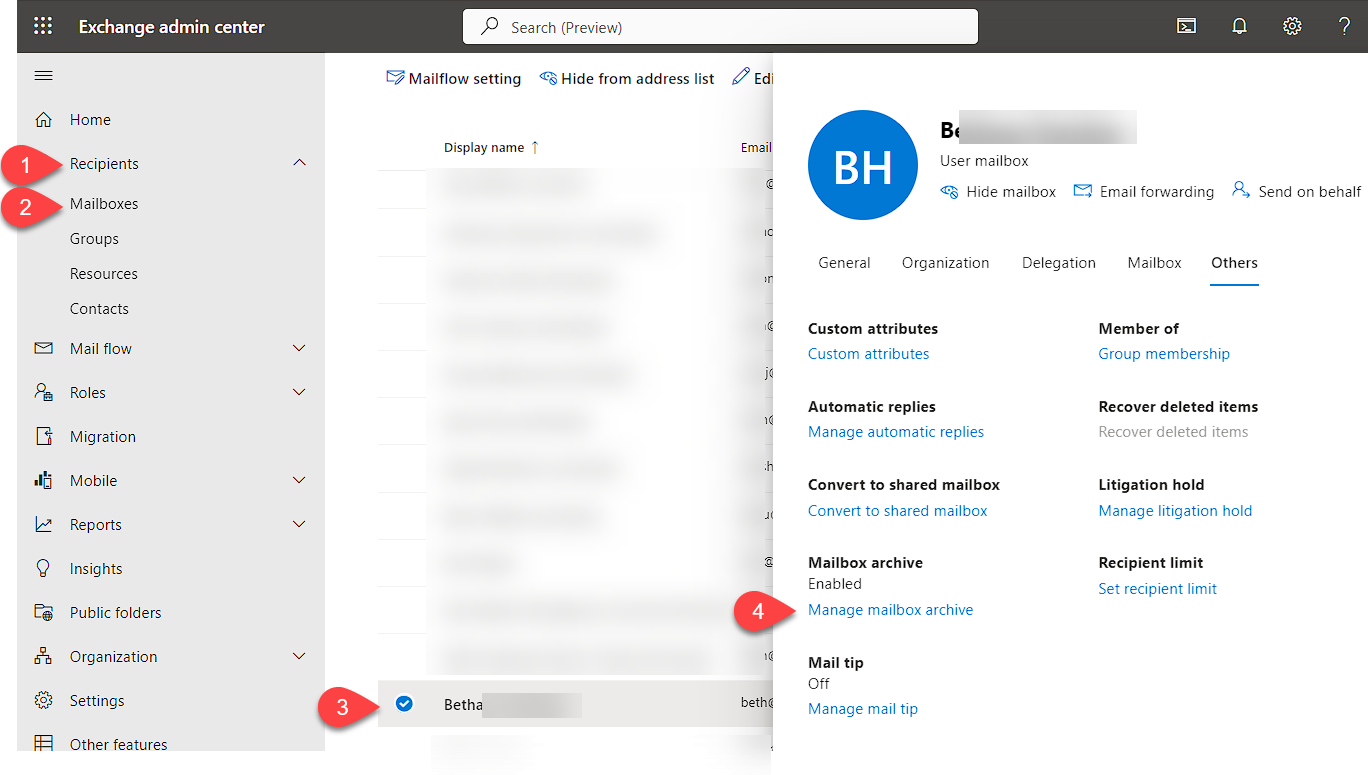
  2. Go to Recipients > Mailboxes to display the list of mailboxes.
  3. Click a user for whom you want to enable the archive mailbox. In the pane that opens, select the Others tab and click Manage mailbox archive

4. Next, set the toggle switch to Enabled and click Save.
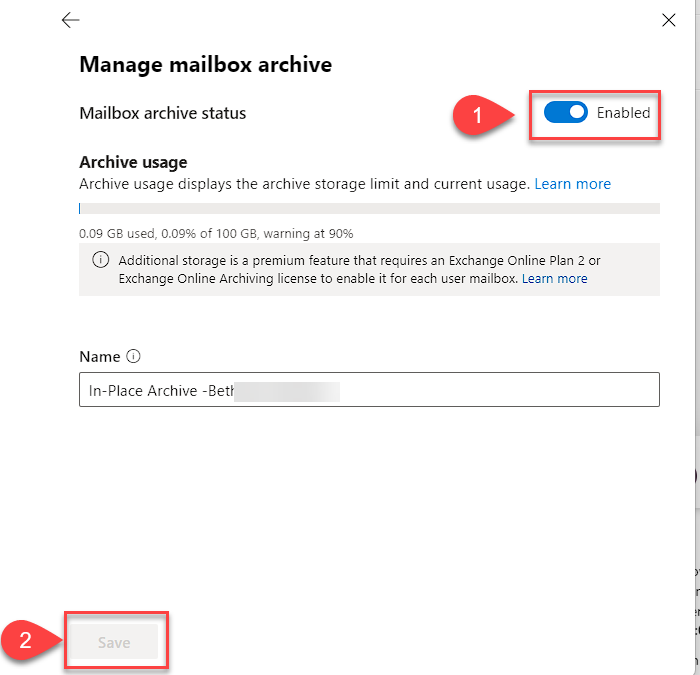
4. Next, set the toggle switch to Enabled and click Save.

Note: It usually takes a few moments to create the archive mailbox in the EAC.

Creating Retention Tags

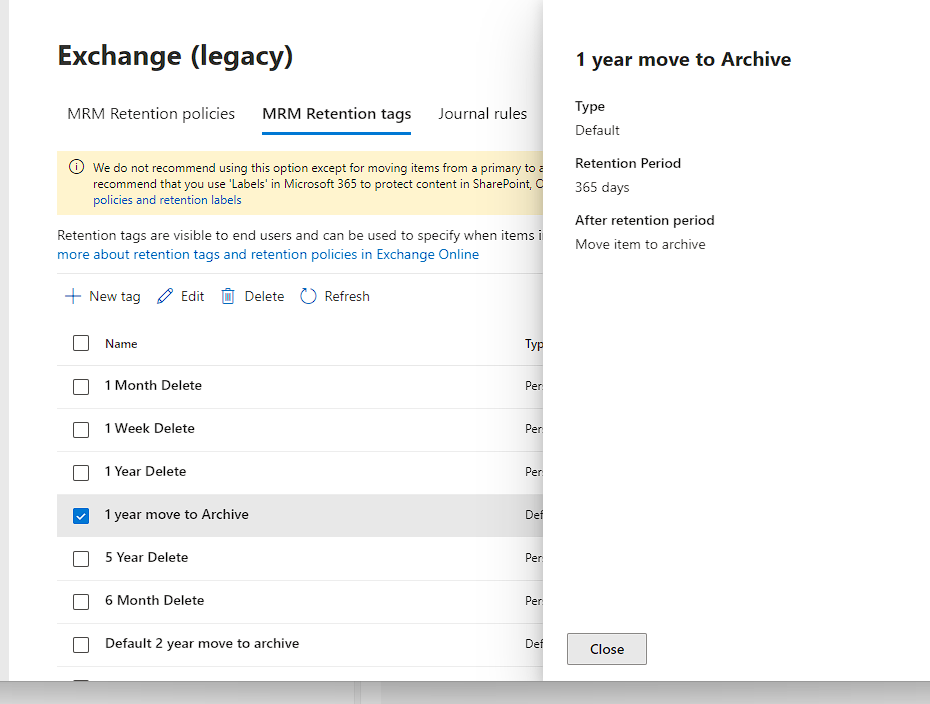
  1. In the Exchange (legacy) – Microsoft Purview go to Information Governance > Retention.
  2. Click the “+” icon to create a new retention tag.
  3. Give the tag a name, choose the type of retention and duration.
  4. Click save.

Applying a Retention Policy

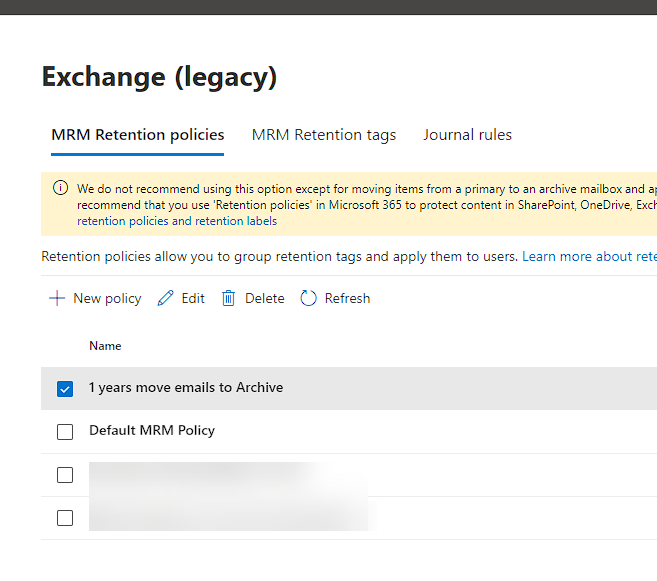
  1. Go to Information Governance > Policies.
  2. Click “+” to create a new retention policy.
  3. Give the policy a name and select the retention tags to apply.
  4. Click save then refresh.
  5. Select the policy and click “Apply to content locations”.
  6. Choose the mailboxes or folders to apply the policy to.
Apply policy to user mailbox

  1. Click Mailbox
  2. Click Manage mailbox policies
  3. Select the Retention policy from the dropdown menu.
Exchange Online Managed Folder Assistant

Exchange Online runs the Managed Folder Assistant (MFA) weekly to process mailboxes per the retention policy schedule. To manually trigger MFA immediately, run this PowerShell command below as administrator.

This will start applying any retention policies right away instead of waiting for the normal cycle.

Powershell script to kick off MFA on exchange online

#Requires -RunAsAdministrator
#Variables
$nameofuser = "name@domainname.com"

# Close and re-open your PowerShell window when done

# Add -Force to it when you need to update EXO V1.
#Install-Module -Name ExchangeOnlineManagement -Force

Connect-ExchangeOnline
Start-ManagedFolderAssistant –Identity $nameofuser

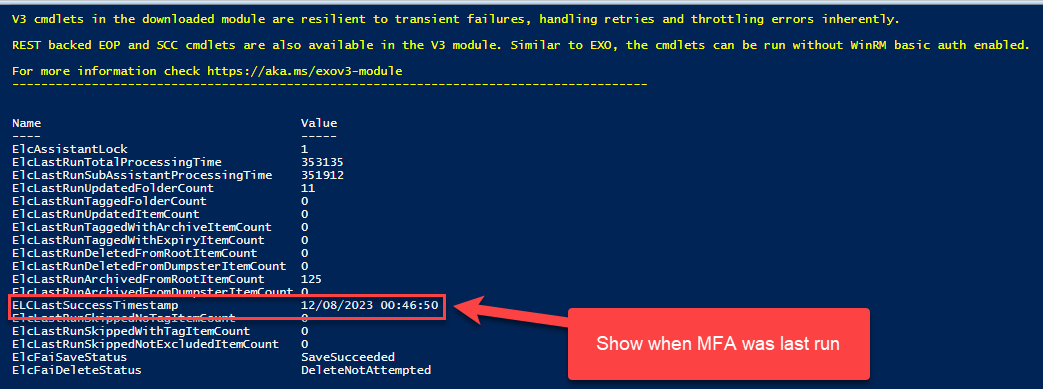
# Run a report to show you the status of when MFA was last run
$logProps = Export-MailboxDiagnosticLogs $nameofuser -ExtendedProperties
$xmlprops = [xml]($logProps.MailboxLog)
$xmlprops.Properties.MailboxTable.Property | ? {$_.Name -like "ELC*"}

The screenshot show a successful run of MFA of a user account on Exchange online
In this guide, we will how to setup a local administrator in windows 10 using PowerShell.

  1. Open Start on Window 10
  2. Search for Powershell ISE, right-click the top result and select Run as Administrator
  3. Copy and paste the code below into thePowerShell ISE editor and save as createAdmin.ps1

Edit the $Username=”New_Account_name” to the username you want. Edit the $Password to the Password you want it to be.

#Requires -RunAsAdministrator
#Variables
$Username = "testuser"
$Password = "password123!"
$group = "Administrators"

$adsi = [ADSI]"WinNT://$env:COMPUTERNAME"
$existing = $adsi.Children | Where-Object { $_.SchemaClassName -eq 'user' -and $_.Name -eq $Username }

    Write-host "Calling local admin script"  -ForegroundColor Green

    if ($null -eq $existing) {
        Write-Host "Creating new local user $Username."
        & NET USER $Username $Password /add /y /expires:never
    
        Write-Host "Adding local user $Username to $group."
        & NET LOCALGROUP $group $Username /add
    }
    else {
        Write-Host "Setting password for existing local user $Username."
        $existing.SetPassword($Password)
    }

    Write-Host "Ensuring password for $Username never expires."

Note: Keeping a password stored in Script would be considered a security risk, Consider replacing the $Password variable with code snippet below

$Password = Read-Host 'What is your password?' -AsSecureString

This PHP tutorial will help you create jquery Datatable 1.10.16 using a Bootstrap 3.3.7. with pagination. The tutorial is broken into 8 steps.

We will use the following structure for the datatable:

  • index.php
  • configDB.php
  • response.php

Step 1: Create a Bootstrap Html page called index.php and include the scripts and CSS below

CSS

<link href="https://maxcdn.bootstrapcdn.com/bootstrap/3.3.7/css/bootstrap.min.css" rel="stylesheet"/>
<link href="https://cdn.datatables.net/1.10.16/css/dataTables.bootstrap.min.css" rel="stylesheet"/>

 <script src="https://code.jquery.com/jquery-3.3.1.min.js"
  integrity="sha256-FgpCb/KJQlLNfOu91ta32o/NMZxltwRo8QtmkMRdAu8="
  crossorigin="anonymous"></script>
    <script src="https://maxcdn.bootstrapcdn.com/bootstrap/3.3.7/js/bootstrap.min.js"></script> 
    <script type="text/javascript" src="https://cdn.datatables.net/r/dt/dt-1.10.9/datatables.min.js"></script> 
    <script type="text/javascript" src="https://cdn.datatables.net/1.10.16/js/jquery.dataTables.min.js"></script>
    <script type="text/javascript" src="https://cdn.datatables.net/1.10.16/js/dataTables.bootstrap.min.js"></script>

Step 2: Add the Html below to inside the body tags

<div class="container">
    <div class
    <div class="header"><h1>Server side DataTable demo in Php,Mysql and Ajax </h1></div>
    <div class="container">
        <table id="employee-grid" class="table table-striped table-bordered" style="width:100%">
            <thead>
            <tr>
                <th>Employee name</th>
                <th>Salary</th>
                <th>Age</th>
            </tr>
            </thead>
        </table>
    </div>
</div>

Step 3: Instantiate the datatable object in index.php

$(document).ready(function () {
          var dataTable = $('#employee-grid').DataTable({
              "responsive": true,
              "processing": true,
              "serverSide": true,
              "ajax": {
                  url: "ajax/response.php", // json datasource
                  data: {action: 'getEMP'}, // Set the POST variable  array and adds action: getEMP
                  type: 'post',  // method  , by default get
              },
              error: function () {  // error handling
                  $(".employee-grid-error").html("");
                  $("#employee-grid").append('<tbody class="employee-grid-error"><tr><th colspan="3">No data found in the server</th></tr></tbody>');
                  $("#employee-grid_processing").css("display", "none");
              }
          });
      });

Step 4: Create a database connection file called config.php

<?php
define('DB_SERVER', 'localhost');
define('DB_USERNAME', 'username');
define('DB_PASSWORD', 'passwordForDB');
define('DB_NAME', 'DatabaseName');
$DBconnect = mysqli_connect(DB_SERVER, DB_USERNAME, DB_PASSWORD, DB_NAME);
//echo "Connect Successfully. Host info: " . mysqli_get_host_info($DBconnect);
if (!$DBconnect) {
    die("Connection failed: " . mysqli_connect_error());
}

Step 5: For this example, you will need to load data from the MySQL database, so we need to create a database table to store and retrieve data.

--
-- Table structure for table `employee`
--

CREATE TABLE IF NOT EXISTS `employee` (
  `id` int(11) NOT NULL AUTO_INCREMENT COMMENT 'primary key',
  `employee_name` varchar(255) NOT NULL COMMENT 'employee name',
  `employee_salary` double NOT NULL COMMENT 'employee salary',
  `employee_age` int(11) NOT NULL COMMENT 'employee age',
  PRIMARY KEY (`id`)
) ENGINE=InnoDB  DEFAULT CHARSET=latin1 COMMENT='datatable demo table' AUTO_INCREMENT=64 ;

--
-- Dumping data for table `employee`
--

INSERT INTO `employee` (`id`, `employee_name`, `employee_salary`, `employee_age`) VALUES
(1, 'Tiger Nixon', 320800, 61),
(2, 'Garrett Winters', 170750, 63),
(3, 'Ashton Cox', 86000, 66),
(4, 'Cedric Kelly', 433060, 22),
(5, 'Airi Satou', 162700, 33),
(6, 'Brielle Williamson', 372000, 61),
(7, 'Herrod Chandler', 137500, 59),
(8, 'Rhona Davidson', 327900, 55),
(9, 'Colleen Hurst', 205500, 39),
(10, 'Sonya Frost', 103600, 23),
(11, 'Jena Gaines', 90560, 30),
(12, 'Quinn Flynn', 342000, 22),
(13, 'Charde Marshall', 470600, 36),
(14, 'Haley Kennedy', 313500, 43),
(15, 'Tatyana Fitzpatrick', 385750, 19),
(16, 'Michael Silva', 198500, 66),
(17, 'Paul Byrd', 725000, 64),
(18, 'Gloria Little', 237500, 59),
(19, 'Bradley Greer', 132000, 41),
(20, 'Dai Rios', 217500, 35),
(21, 'Jenette Caldwell', 345000, 30),
(22, 'Yuri Berry', 675000, 40),
(23, 'Caesar Vance', 106450, 21),
(24, 'Doris Wilder', 85600, 23),
(25, 'Angelica Ramos', 1200000, 47),
(26, 'Gavin Joyce', 92575, 42),
(27, 'Jennifer Chang', 357650, 28),
(28, 'Brenden Wagner', 206850, 28),
(29, 'Fiona Green', 850000, 48),
(30, 'Shou Itou', 163000, 20),
(31, 'Michelle House', 95400, 37),
(32, 'Suki Burks', 114500, 53),
(33, 'Prescott Bartlett', 145000, 27),
(34, 'Gavin Cortez', 235500, 22),
(35, 'Martena Mccray', 324050, 46),
(36, 'Unity Butler', 85675, 47),
(37, 'Howard Hatfield', 164500, 51),
(38, 'Hope Fuentes', 109850, 41),
(39, 'Vivian Harrell', 452500, 62),
(40, 'Timothy Mooney', 136200, 37),
(41, 'Jackson Bradshaw', 645750, 65),
(42, 'Olivia Liang', 234500, 64),
(43, 'Bruno Nash', 163500, 38),
(44, 'Sakura Yamamoto', 139575, 37),
(45, 'Thor Walton', 98540, 61),
(46, 'Finn Camacho', 87500, 47),
(47, 'Serge Baldwin', 138575, 64),
(48, 'Zenaida Frank', 125250, 63),
(49, 'Zorita Serrano', 115000, 56),
(50, 'Jennifer Acosta', 75650, 43),
(51, 'Cara Stevens', 145600, 46),
(52, 'Hermione Butler', 356250, 47),
(53, 'Lael Greer', 103500, 21),
(54, 'Jonas Alexander', 86500, 30),
(55, 'Shad Decker', 183000, 51),
(56, 'Michael Bruce', 183000, 29),
(57, 'Donna Snider', 112000, 27);

Step 6: Create the response.php and include the connection at the top of the file

if (isset($_POST['action']) && !empty($_POST['action'])) {
    $action = $_POST['action'];
    switch ($action) {
        case 'getEMP' :
            getEMP($DBconnect);
            break;
        case 'getProd' :
            getProducts($DBconnect);
            break;
        // ...etc...
    }
}

Step 8: Create the function getEMP and pass in the $DBconnect object.

function getEMP($DBconnect)
{
// storing  request (ie, get/post) global array to a variable
    $requestData = $_REQUEST;
    $columns = array(
// datatable column index  => database column name
        0 => 'employee_name',
        1 => 'employee_salary',
        2 => 'employee_age'
    );
// getting total number records without any search
    $sql = "SELECT employee_name, employee_salary, employee_age ";
    $sql .= " FROM employee";
    $query = mysqli_query($DBconnect, $sql) or die("Mysql Mysql Error in getting : get products");
    $totalData = mysqli_num_rows($query);
    $totalFiltered = $totalData;  // when there is no search parameter then total number rows = total number filtered rows.
    $sql = "SELECT employee_name, employee_salary, employee_age ";
    $sql .= " FROM employee WHERE 1=1";
    if (!empty($requestData['search']['value'])) {   // if there is a search parameter, $requestData['search']['value'] contains search parameter
        $sql .= " AND ( employee_name LIKE '" . $requestData['search']['value'] . "%' ";
        $sql .= " OR employee_salary LIKE '" . $requestData['search']['value'] . "%' ";
        $sql .= " OR employee_age LIKE '" . $requestData['search']['value'] . "%' )";
    }
    $query = mysqli_query($DBconnect, $sql) or die("Mysql Mysql Error in getting : get products");
    $totalFiltered = mysqli_num_rows($query); // when there is a search parameter then we have to modify total number filtered rows as per search result.
    $sql .= " ORDER BY " . $columns[$requestData['order'][0]['column']] . "   " . $requestData['order'][0]['dir'] . "   LIMIT " . $requestData['start'] . " ," . $requestData['length'] . "   ";
    /* $requestData['order'][0]['column'] contains colmun index, $requestData['order'][0]['dir'] contains order such as asc/desc , $requestData['start'] contains start row number ,$requestData['length'] contains limit length. */
    $query = mysqli_query($DBconnect, $sql) or die("Mysql Mysql Error in getting : get products");
    $data = array();
    while ($row = mysqli_fetch_array($query)) {  // preparing an array
        $nestedData = array();
        $nestedData[] = $row["employee_name"];
        $nestedData[] = $row["employee_salary"];
        $nestedData[] = $row["employee_age"];
        $data[] = $nestedData;
    }
    $json_data = array(
        "draw" => intval($requestData['draw']),   // for every request/draw by clientside , they send a number as a parameter, when they recieve a response/data they first check the draw number, so we are sending same number in draw.
        "recordsTotal" => intval($totalData),  // total number of records
        "recordsFiltered" => intval($totalFiltered), // total number of records after searching, if there is no searching then totalFiltered = totalData
        "data" => $data   // total data array
    );
    echo json_encode($json_data);  // send data as json format
}

Links to the Demo and Source code below.

Update: Dark Sky APi was shutdown in August 1st 2020

This is a PHP website that connects to Dark sky API to get current weather conditions and a 5-day weather forecast and display it as a responsive web page. it uses the IP address sent to the web server as a request which is then sent to Ip loc API which sent back the latitude and longitude(20-30 km accuracy) of the Requester.

The libraries and API used in this project were:

Link to Github repo

<?php array(337.5, 22.5),
'NE' => array(22.5, 67.5),
'E' => array(67.5, 112.5),
'SE' => array(112.5, 157.5),
'S' => array(157.5, 202.5),
'SW' => array(202.5, 247.5),
'W' => array(247.5, 292.5),
'NW' => array(292.5, 337.5)
);
// for statement to convert degree to wind direction eg west
foreach ($cardinalDirections as $dir => $angles) { // convert degrees into wind direction => is separator, key value pair
if ($bearing >= $angles[0] && $bearing < $angles[1]) {
// if bearing greater than/equal and less than ,
// then set direction to = dir
$direction = $dir;
break;
}
}
return $direction;
}
$direction = degreeToString($bearing); // calls the degree to string function
//Daily Forecast
$dailySummary = $resultsDark['daily']['summary'];
$dailyIcon = $resultsDark['daily']['icon'];
$dailyCond = array();
foreach ($resultsDark['daily']['data'] as $d) { // for loop through array to find Key daily and value data,
// set that as a new array dailycond
$dailyCond[] = $d;
}
foreach ($dailyCond as $cond) {
$wTempHigh = round($cond['temperatureMax']);
$wTempLow = round($cond['temperatureMin']);
$wTime = $cond['time'];
$wIcon = $cond['icon'];

}

Internet usage is most common in every PC be it your personal computer or at the office. Security is the first thing that anyone would be concerned about as internet connectivity has its own pros and cons and hacking is one of the most important concerns for most of the PC users. Now, PC users can be relieved of these concerns as below given are some simple steps which they can easily adapt and get their computers and online accounts secured.

Removal of the pre-installed software and apps:

With the recent Man-in-the-middle attack in the Lenovo computers, the pre-installed apps and software really seem to be very dangerous. Most of the times it is just a bloatware unless the user really has some use of all these apps and software hence getting rid of this definitely safeguards the computer against any security threat. Further, it is better to get rid of any pseudo antiviruses accompanied with the new computer.

Choosing a secured web browser:

This is an important task as most of the malicious malware comes through the web browser. Setting the right web browser is essential because the correct web browser can help the user to safeguard against all the malware and also help the user to use their computer to the best. Depending upon the age of computer and the device that is being used, the user needs to choose the correct web browser. Further, Google Chrome is one of the best web browsers which provides additional security via Sandbox feature. If the user wants to add further features they can use the Mozilla Firefox extensions also. Basically, the user needs to know what they want from their browser then check the features and check if the browser meets their requirement then start using that browser. (more…)

Weather forecast data from a free API provided by Darksky.net. The android app then parses the data (in JSON format) and display it in a single-page app. it also can handle errors and situations when the network is unavailable.

Features used in this project are:

  1. Networking
  2. OkHttp
  3. DarkSky API
  4. Parsing JSON feed
  5. DialogFragment

These Guides will show you how to configure and use the whisper feature on Mumble.

Video Guide

Written Guide

Follow these Steps:

1. Click on Configure mumble and then click on “Settings.” (more…)

Mumble MOTD: Message of the day

MOTD Mumble.ini Message of the day, Example on how to make a Message of the Day (MOTD) on a Mumble server.

Instead of welcometext=“Welcome to this server running Murmur.”

Full Murmur.ini guide

HTML Examples in the Mumble.ini

Example logo in the welcome message:

<a href="https://www.google.com"><img alt="Your logo here" src="http://i.imgur.com/m4NsCG0.jpg" width="250"></a>

Examples of a contact/Officer list:

(more…)

Simple weather application using php and Darksky ap